by Jerry Vigil
Some of the best features of today’s digital recording technology come together in the Darwin from E-mu Systems. And the icing on the cake is the affordable price tag. For under $2,000, you can arm your studio with an 8-track digital recorder with full editing capabilities, a user interface that is as friendly as they get, and features that let the Darwin grow with your studio. If you’ve been looking for a digital workstation that moves you smoothly from analog tape-based multitracks into the digital world of random access, or if you’re looking for the perfect compliment to your ADAT setup, take a look at the Darwin.
To the Rear
The fully self-contained system resides in a 3 rack-space unit. The rear panel provides balanced analog output of all eight tracks on 1/4-inch TRS connectors. There are four analog TRS balanced inputs with eight available using the optional Analog Input Expander card. Input and output levels are switchable between -10dBu or +4dB. RCA connectors provide stereo S/PDIF or AES/EBU digital I/O. MIDI IN, OUT, and THRU ports supply remote control of the Darwin and the ability to sync the Darwin with external MIDI sequencers and computers using MIDI Time Code. Other rear panel connectors include the Audio HD SCSI port for connecting external SCSI drives, and a footswitch input enables remote punch-in/out control.
There are five “option” ports on the rear panel. One is for the Analog Input Expander. The Host Computer SCSI port is for a hardware/software combo that will allow the Darwin to be connected to a computer to enable graphic waveform display, editing, and more. This is currently still in development. The other three option ports can be used for a number of things. The unit shipped for this review included the ADAT sync card and ADAT optical I/O card. The ADAT Sync card allows connecting up to sixteen digital recorders using the same sync format (including the Fostex RD-8), and the ADAT optical I/O option permits transferring up to eight tracks of audio between machines.
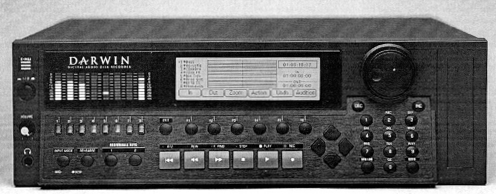
Up Front
The attractive front panel is dark gray with large, easy to hit buttons. The transport controls are especially large. You get the usual REW, FFWD, STOP, PLAY, REC, and RTZ (return to zero). To the far left of the panel are the power on/off switch, a headphone jack, and headphone level control. Next to these are the 10-segment peak holding bargraph level meters. Below each of these is the corresponding track record enable button. The INPUT MODE button toggles between Auto Input mode and Normal mode. In Auto mode, playback of record enabled tracks is monitored until recording begins, at which time monitoring switches automatically to input signals. The REHEARSE button permits practicing punch-ins without actually recording.
There are two ASSIGNABLE KEYS that the user can assign various functions to. Use these keys to audition the selected audio or the clipboard audio with one press of the button, or use for quick access to various screens without stepping through menus.
At the far right is a numeric keypad used for data input and for naming projects. It is most handy as ten autolocate points. Press the STO LOC key followed by any of the ten numeric keys to quickly store a locate point. Pressing the number key again at any time instantly locates to that point. Press the GOTO button to enter a location in the time display and instantly locate anywhere within a project. The Darwin features four banks of ten autolocate points.
The heart of the user interface is the large graphical display at the top center. Measuring approximately 5 inches wide by 1 1/2 inches high, the display is surprisingly easy to read and understand. Six function keys below the display act as soft keys to perform various functions as shown directly above them in the display. Four arrow keys and the large Jog/Shuttle wheel are used for navigation throughout the various screens.

Projects and Versions
The main display screen offers six menu choices: Project, Version, Edit, Locate, System, and Routing. Darwin boots to whatever project was open during the last power down. Along with the six menu choices, the main display screen also shows information about the current project. There are indicators to show which drive is selected (for multiple drive setups), total drive capacity, and how much disk space is left on the drive. Track indicators display names given to each track and which tracks have data on them. The current project’s name is displayed along with the current version name. The Darwin can store as many projects as you have disk space for, and each project can have as many versions as desired. A version is simply a copy of the original, and it doesn’t take up additional disk space. This is a very useful way to make a quick copy of a project that you want to experiment on. Or, say you’ve produced a commercial that needs updates on a voice track, but you’ve used up all eight tracks. Make a new version. It’s fast, and it keeps the original intact. In terms of needing extra tracks for updates and so forth, this is as good as having unlimited tracks. And you can move tracks between versions.
To create a new project, press the Project function key from the main menu. The sub-menu gives you options to create a new project, open an existing one, delete projects, rename projects, and copy projects. The Copy function is not the same as creating a new version. This function actually copies the audio to a new location and claims the same amount of disk space as the original. When a new project is created, you are given the option to name it and select the sampling frequency (44.1kHz or 48kHz). Once you’re in a project, press the Version function key to create new versions, select existing ones, delete versions, rename versions, reclaim unused disk space, and more.
Recording and Editing
Once you’re in a project, recording and editing can begin. Recording is a straightforward process involving nothing more than arming the tracks to record on and pressing PLAY and REC. After recording, the Darwin takes a few seconds to finish writing the file, then it’s ready for playback and editing.
Press the Edit function key from the main menu to display a graphical representation of the eight tracks and the audio on them. This is where most of your work is done. As mentioned, there is no waveform display. What you see on the screen for audio are horizontal rectangles on each track. Below the track display are six function key selections: In, Out, Zoom, Action, Undo, and Audition.
Locating edit points is done with your ears and the Jog/Shuttle wheel. There is perhaps a 100ms delay on the ballistics of the Jog/Shuttle wheel when using it to cue to an edit point. It’s just enough to make you feel a little uncertain about a very precise edit point, but you begin to trust yourself and the machine after some practice. For most editing purposes--voice tracks and music beds--it’s accurate enough. But very precise editing--removing clicks, making perfect loops--can take more than one try at marking the edit points. Bear in mind that this describes the Darwin scrubbing a Jaz drive which is significantly slower than internal drives or other external high-speed SCSI drives. Though we didn’t have the internal drive to play with, E-mu tech support assured me that scrubbing on the internal drive was significantly better that with the Jaz drive. If your work is editing intensive, a faster drive is a must.
When edit points are found, mark them with the In and Out function keys. The marked or selected audio is highlighted on the selected tracks. Track selection is done with the four arrow keys, and one or all eight tracks can be selected for editing. Press the Action function key to see the selection of editing functions. Copy places the selected audio in the clipboard leaving the original in its place. Cut removes the selected audio from the tracks, places it in the clipboard, and splices the remaining audio together. Insert places the clipboard audio on the selected tracks and moves other audio down the tracks. Replace is the same as Insert, only the audio on the destination track is overwritten rather than moved down the track. Erase removes the audio from the tracks but does not “splice” the two ends of the remaining audio together. Extend is the equivalent of leader tape. The Move function moves selected audio up or down the track by a user set amount of time. All editing functions are written to the drive when executed. With the slower Jaz drive, this tended to make editing a bit sluggish, with some actions taking as much as five seconds. E-mu tech support also stated that this process is faster with the internal drive.
If you have the optional DSP card, you get some additional editing choices: Gain, Fade, Pitch, and Time. Gain adjusts the level of the selected region from +24dB to complete silence. Normalize analyzes the level of the selected audio and raises the level the amount needed to obtain 0dB of headroom. If you have a project with a lot of short sound effects recorded at varying levels, for example, the Normalize function can make the mixdown a lot easier. The Fade function is another useful feature of the DSP card. Mark the area to be faded and perform perfect fades. Fade in or out, set fade-in and fade-out levels, and more.
Pressing Pitch accesses the DSP card’s pitch shifting algorithms. You get the usual pitch shifting found on most effects boxes. These are called time domain algorithms. But you also get two other sets of algorithms. The phase vocoder and formant/polygender algorithms take pitch shifting to another level. Those of you producing music will love these features. For radio production, the result is some of the best pitch shifting I’ve ever heard, and there are pitch effects I’ve never heard. It’s like getting your first pitch shifter all over again. The polygender effect does more for changing the gender of a voice track than any conventional pitch shifter I’ve played with. The only drawback is that with the phase vocoder and polygender algorithms, you have to process the audio file before you can hear the effect. This is time consuming, but the results can be worth it. If these pitch effects aren’t already part of an effects box somewhere, they should be.
Finally, the DSP card offers time compression/expansion. Here also, the Darwin offers several different algorithms for processing different types of audio. Squeezing a sixty second voice track by ten percent took a little under thirty seconds to process. Once again, this processing time is probably cut considerably when using an internal drive rather than the Jaz drive.
Other menu selections in the Edit menu include a Zoom function that toggles between four zoom levels which is helpful if you have some very short elements on tracks. Pressing the Audition function key presents four options for auditioning clipboard and selected audio. The Undo function undoes and redoes up to the last sixteen editing and record operations.
System and Routing
The System selection from the main menu accesses various system parameters. Here you can setup the disk drive configuration, format drives, set undo levels and crossfade times, set the system date, set the ASSIGNABLE KEY functions, perform system tests, and set the digital I/O format (S/PDIF or AES/EBU), to mention a few things. The Darwin’s backup function is in this section. Darwin allows backup to DDS data DAT, but you can only back up the entire drive, not individual projects.
The Routing selection accesses the Darwin’s internal digital patchbay. Use the patch bay to set up the I/O in a variety of configurations. With the optional Input Expander card, you can set up eight individual inputs and eight outs. A typical broadcast production setup might be to route input 1 to tracks 1, 3, 5, and 7; and route input 2 to tracks 2, 4, 6, and 8. Then take all eight outputs to your console. The patchbay is also where the routing can be set to bounce tracks in the digital domain by taking the digital outputs and routing them to one or two tracks. A maximum of six tracks can be bounced down to two.
There is also an internal digital mixer in the Darwin. Press the Mixer function key from the Routing sub-menu to gain access to level controls and pans for each of the eight tracks. The output of this mix is fed to the headphone jack and to the digital output. The mixer does not affect the analog outs. Since there are no EQ options or effect sends on the mixer, its use is more dedicated to bouncing tracks rather than performing digital mixdowns. It also serves as a submix when needed.
Summary
I found the Darwin extremely quick to learn and easy to use. With a five minute lesson, anyone with analog or digital multitrack experience can be recording and mixing in no time. Another five minute lesson, and editing can be added to the repertoire. The Darwin doesn’t offer “unlimited virtual tracks” or a massive array of internal digital effects. This is partly what keeps the Darwin uncomplicated. Instead, you get an 8-track digital recorder with some extensive editing capabilities. If you’re looking for something more than an ADAT or DA-88, something that gives you random access editing capabilities, but you still want to bring your tracks to the console for EQ, effects, and the mixdown, the Darwin fits the bill very nicely. For broadcast production, 32kHz sampling would have been a nice option, but with the price of hard drives going down, and the size going up, this can almost be overlooked.
The Darwin is being distributed exclusively by Guitar Center and Sweetwater Sound with street prices under $2,000. Options and their prices include the Analog Input Expander ($249), the ADAT Digital I/O ($149), the ADAT Sync Card ($379), the DSP Card ($699), and the Jaz upgrade ($849). Additional specs on the Darwin include frequency response at 20-20kHz, THD+N at <0.05%, and S/N >100dB. Data encoding on the input is 16-bit and 18-bit on the output. The software version in the unit used for this review is version 2.01 dated April 21, 1997. This is major upgrade from the previous software, and it ran crash and error-free for the few weeks we had the unit.
♦
