![]() When a surgeon is prepping to carve into your body, he/she will sit down and plan every step of the procedure with assistants, practical nurses, surgical team technicians and the anesthesiologist. Having done a few procedures over time, they know they’ll need scalpels, metzenbaum scissors, sponges, betadine, lights, oxygen…well, the list goes on a bit. If it’s cardiac surgery, they know they’ll need rib spreaders. If it’s cranial, they’ll need a saw. Once the surgeon is scrubbed, draped and gloved, he or she will approach the table, call for a 10 blade and begin the dance to save your sorry butt. (I’m not sure what extra they’d need for butt surgery, but I’m sure there’s something.)
When a surgeon is prepping to carve into your body, he/she will sit down and plan every step of the procedure with assistants, practical nurses, surgical team technicians and the anesthesiologist. Having done a few procedures over time, they know they’ll need scalpels, metzenbaum scissors, sponges, betadine, lights, oxygen…well, the list goes on a bit. If it’s cardiac surgery, they know they’ll need rib spreaders. If it’s cranial, they’ll need a saw. Once the surgeon is scrubbed, draped and gloved, he or she will approach the table, call for a 10 blade and begin the dance to save your sorry butt. (I’m not sure what extra they’d need for butt surgery, but I’m sure there’s something.)
The point is, they have a template to work from. They’ve done enough surgeries to know all the basic things they’ll depend on once the operation begins. The tools they’ll need sit on what is called a surgical tray. What is your surgical tray? There are certain things you know you’ll need in nearly every piece of production. A few VO tracks, some music tracks, plus maybe an effects track or two. Then you have all of your “go-to” plugins like EQ, compression, reverb, noise reduction. Having everything laid out the way you like it, ready to simply start recording, fixing and mixing is smart and easy… once you design your template. When you sit down to start a new project, being able to have a familiar landscape for your work goes to more than just your comfort level. It allows you to gin things up without pondering how many VO/Music/Effects tracks you’re going to need, because everything is already laid out. Designing a template for session work is the ultimate shortcut.
The Ins and Outs of Your Template
Bussing is the fundamental building block of maintaining audio flow within your DAW. If you can NAME your busses, it will make life ever so much better. On my system, I have 64 busses, or 32 pairs available. Some systems have more, some less, depending on how robust your system is. I could have 128 busses, but I have yet to EVER need that many in broadcast production. If a bus is going to be used exclusively as a mono bus, you can name them individually, like Mic 1 and Mic 2, otherwise you can simply name bus pairs as designated stereo feeds. On my particular template I have them named Mixer, Compression, Flange, Reverb and, in a throwback mode, Bounce. (I don’t use that one anymore now that I can bounce directly to file.) It doesn’t matter what order they’re in. When you set an input or output on any fader or sub, it just has to be consistent.
Assuming you’re not a complete newbie, go back and look at what you’ve done previously. How many inputs did you use? How many sub-masters did you use? If you used multiple outputs, take that into account too. (I don’t, typically, but you gotta do you.) Take notes and decide what will be most helpful in this regard over the course of many, many sessions. Don’t forget that you can quickly add additional tracks, subs and masters when you’re in the throes of production. (Your own version of the surgical bone-saw.)
My own template has two input subs for one mic. Some of my clients want the super-duper-Z100-ultra-tight-hi-pass sound while others want it flat. They both get the same input assignment (there are no rules against that), but have different bus assignments on the output tabs. I USED to have another input sub that allowed me to quickly assign the input side to whatever device source material was on: CD, DAT, VCR, Turntable, etc., but I almost never use any of those sources anymore, so I deleted it. Almost everything I use for source material now comes in the form of a WAV or MP3 file. I download all my music directly to my hard drive and all my effects (both electronic and natural) are already stored in the system. I DO know several producers who mix music using a DJ system (turntable or CD) and have an input for that device.
I highly recommend having one sub-master for VO and another for music and effects, ALL stereo. You can divide the latter two into separate subs if that works better for you. Any processing you do on the VO sub will then be exactly the same across all of your VO tracks. Keep the processing on the music/FX sub to a minimum…for now.
Another sub-master you’ll want to consider is one dedicated to Reverb. Set the input to your reverb bus and the output to your mixing bus. Then drop your favorite reverb plug-in on the top insert. I use the WAVES Renaissance Reverberator plug-in because I do so many concert spots/promos. It gives me the most flexibility in designing the space involved (Madison Square Garden vs. a smaller venue like the Hammerstein Ballroom), and it has, by far, the easiest graphic display I’ve seen. A lot of my work doesn’t require any reverb at all, so it will sit there, unused most of the time, but having it constantly at the ready can speed things up when I do need it.
I also have an additional sub-master that you might find useful, perhaps using a different effect or even the same one. I “flange” my main VO, ever so slightly, without the wandering null point, by putting a delay plug-in on my “flange” sub and setting it to 20ms on one side and 40ms on the other, but I set the ‘wetness’ to 20%. This allows 80% of the signal to go straight through while adding the really short delay to the mix. Then, I set the output of my extra ‘flange’ sub to the main VO sub-master which is where ALL the voice tracks get compression and (sometimes) EQ. The other voice tracks? Read on.
Keeping Track Of Your Tracks
My VO tracks are all MONO, which gives me absolute control of pan-placement should I need it. I have a track for artist drops, one for listener/crazy drops, two for the main VO and one for a special hi-pass filter. The hi-pass track uses a 1kHz hi-pass EQ module and a compressor to squash the living hell out of the track before I send it to the VO sub-master. (The Hi-Pass track must use a ‘clipping’ type compressor like the WAVES L1 or you will get some awful distortion.)
Once created, I make sure I name each track so that anything recorded on that track will be properly stamped for future reference. When I look in the bin, the LAST thing I need to see is 45 files named Audio 1-01 thru 45 ad nauseam. Just double-click on the ‘scribble strip’ at the bottom of the fader and name it. I start each VO track name with a special character (√) so that all VO files will be grouped together in the bin. Then I add Artist, Listener, Main A and Main B, and finally Hi-Pass. I do the same ‘special character’ thing with music tracks, but with a different character (•). Of course, you can choose special characters that make sense to you. I start with 2 Music and 2 FX tracks (special character ƒ), all stereo, of course.
Now…Processing Your Music/FX
Remember how I said not to put much of any processing on your Music/FX sub-master? Glad you waited, ‘cause NOW we’re gonna do something fun! It’s called side-chain processing, and this alone might be worth the time you’ve put into reading thus far. It can be a REAL time-saver.
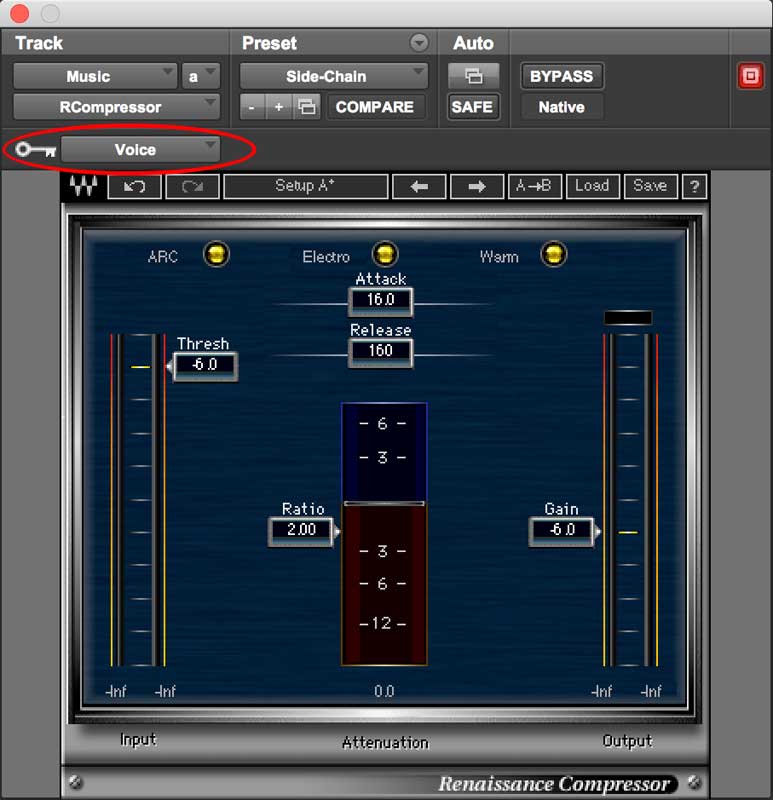 Open a comp/limiter on your music/FX sub-master and set the KEY Input to the VO sub-master. (Not all comp/limiters are created equal…at all. If there is no KEY Input button on the comp/limiter you’ve chosen, [check out the graphic] choose a different one because that one won’t work.) Once you’ve got the KEY Input selected, adjust the Threshold down to about -6db and set the Gain to about -6db. When you’re in play mode, the gain on the music/effects sub-master will automatically duck 6db whenever the VO is hot. When the VO track is silent, the music will play at full parity. Easy-peasy, right? (A LOT easier than manually ducking each music track!)
Clearly, you might need to make adjustments to the threshold and gain, depending on the thickness of the music, -6db is my ‘go-to’ start point. You should also keep the attack and release pretty loose just because it’ll smooth the transitions nicely. I find that if I keep the ratio fairly light, it will ultimately sound better too as it won’t make the music sound chunky, especially once you add your master compression.
Setting Up Your Yoda
Now your Master fader should have two plug-ins on it: EQ and compression. The master EQ is what you might want to have if you want to “color” the overall sound of the finished piece. Most of the time, if you’ve been careful up to the mastering stage, you won’t use it, but I keep it there just in case I want to brighten (or darken, I suppose…though I never have) the entire production.
The master compression is really just a control function, to deal with those moments when music and VO and effects all seem to hit at the same moment, driving a huge spike in gain overall. Some super light compression will deal with those oddities quickly and easily, giving the end product a nice, glossy finish, without pounding the hell out of the sound. Nobody likes clipping on music…trust me. An easy ratio of 2:1 will normally handle everything for you just fine. If the spot/promo is a bit more aggressive, you can always up it to 4:1 or just lower the threshold.
So…Now It’s Built
The way you save a template varies from system to system and DAW to DAW, so you’ll need to suss that out, but now that you have it, save it as your template. Every time you start a new project, you have all of your tools laid out, ready to rock. Within a couple of weeks, you’ll wonder how in the world you did everything on the fly before. You may find that you have to adjust your template from time to time, to take advantage of a new technique you’ve learned or a new plug-in you’ve acquired, but it will serve you well over time. Your production will start to grow in strength because you’re not as concerned about ‘how’ to get there as ‘why.’ Your consistency will jump and the powers-that-be will come to rely on you as a “fire-and-forget’ weapon in their quest for market dominance. Your stock will rise in the company, eventually resulting in a hefty raise and a lot of respect from your bosses and the radio community.
You’re welcome.
A tidbit of sound this month that you might find interesting. I recently picked up a new plug-in called ERA 4 Voice Leveler that I am pretty psyched about. It’s now on my template’s two VO sub-masters, but is most evident on the ‘flat’ response sub. A couple of months ago, I noticed that my VO tended to taper off a bit toward the end of a phrase or sentence and was leaning toward putting a little more compression on my tracks. Instead, I started looking for something that wouldn’t glom up my VO (any more than what it is) and was delighted when I came across this beauty. It’s what I call a “gentler-kinder’ compressor that actively, yet subtly brings up the gain when it normally fades a bit, without crushing the normal track. I’ve recorded a short bit of copy and created a file in which the first half is truly flat, followed by the same track with the ERA 4 Voice leveler. It’s part of a larger suite of plug-ins that clean up tracks, including noise reduction and reverb removal. See what you think!
