![]() Q It Up:What Adobe Audition tips or tricks have you learned lately? Maybe a new way to set up the mixer? Editing techniques to speed things up? A cool way to use a plug? Feel free to add any other related comments and thanks for your feedback!
Q It Up:What Adobe Audition tips or tricks have you learned lately? Maybe a new way to set up the mixer? Editing techniques to speed things up? A cool way to use a plug? Feel free to add any other related comments and thanks for your feedback!
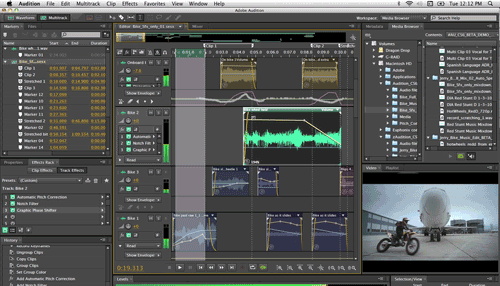
Craig Jackman, Professor – Radio Broadcasting, School of Media, Arts, and Design, Loyalist College: If you are used to using Audition 1.5 or 3 and find yourself upgrading to Audition CC or CS6, it’s worth taking the time to go through the Audition Classroom in a Book, which is about $45 on Amazon. There are so many small changes that will make a big difference in your workflow, particularly if you use Time Stretch frequently. The same things that work in previous versions still apply, like setting up your personal keyboard shortcuts; if you use dual monitors, setting up what you need to see in Waveform and Multitrack view. Once you realize the virtual mixer works the same as a hardware mixer, it opens up lots of possibilities using Sends and Subs and applying effects there once, instead of applying effects multiple times across multiple tracks.
Russell More, Producer, Island Radio/Jim Pattison Broadcast Group, Nanaimo, BC: I use Adobe every day and the biggest thing I preach to anyone I teach is to first know what plug-ins/features/actions they're using. Use them till their location in the deepest sub-root menu and what action is being performed is burned into your psyche. Then commit them to a hot key. Something that's easy for you to remember, and then make that hot key your second nature. Full session mixdown? Toss a bit of compression on a mix? Need to normalize a file really quick? Just a push of a button and your favourite settings are applied.
Hot keys save me what might only seem like a few seconds here or a minute there, but when we're moving on to commercial number 145 of the week, that adds up really quick.
Another tip I've picked up along the way is to take advantage of tailoring your bus tracks. I have one regularly set up in my default session for voice parts. Any new tracks I add that I intend to put voice on, I set them to my VO bus which has a dynamics processor and a hint of compression. All that's needed on the main track is an announcer specific EQ.
Alexander Zaretsky, Student, SAIT, Calgary, Alberta: It's an easy trick, but if you’re new to Audition or any DAW, this tip can be very helpful. It sure helped me.
Bouncing tracks. Why? When? How?
When working with a sound file in Audition, if you want to mess around with a certain part of the file, and you don't want to change the original file you can copy the part of the file that you want. Then paste it into a different track (I use the bottom tracks so my track numbers don't change) then right click on the clip and at the bottom of the menu you will see bounce - bounce selected audio only. And voila! That clip is now its own little file.
This is really helpful when you want to make a group of clips into one clip. I do this because it's easier to move one file than trying to move a bunch of files, especially when you need to be precise when moving the files. As an example: A robot voice. After you have bounced the file. I keep an original, and two other bounces: one for the high octave one for the low octave. Once I have them placed where I want them to be so the robot voice sounds the best it can, I highlight all three and bounce into a single track. This means all three are now in one, much simpler to move around and keep track of.
This is my tip. Like I said, easy, but for a newcomer it can be really helpful.
Ben Thorgeirson, benthorgeirson.com: I set up my Adobe with 2 vocal tracks at the top and they are sent to a bus to be processed. The bus is then sent to my master track that has some more processing on it. I have a basic "Session Template" with this structure on it that I copy into all of my session folders and then 'Save As' with new sessions. It makes it easier on a Friday when all of the last minute spots come in, and I don't have to worry adding each individual plugin every time. The settings on the plugins are pretty universal for every voice, so it only needs to be tinkered with a little bit. I learned this from using Pro Tools. I love using Audition now because it's such a simple way of making great sounding spots. Also, if you can, get a Waves pack, ANY pack. It just makes the production pop more and sound way better. I heard a spot I made on an AM station through a clock radio the other day and it was crystal clear.
The program is free, but deserves a donation at: http://www.aatranslator.com.au/ses2sesx.html.
Joey DiFazio, SiriusXM, New York, NY: Saving sessions. Some tips for those of you who hop from machine to machine and use an external hard drive. After I’ve mixed down my final track, I like to use “Close Unused Media” from the file drop down. When I build a session there’s always a bunch of elements that I did not use still in my library. These will be saved with your session and takes up a lot of hard drive space. Choose Close Unused Media before you save. Then I “save as” and write over the original session. As a matter of course, I always put a backup session file in my session folder. I can’t tell you how many times this has saved me - and the session files are small - so space is not an issue. Then you’ll need to do a “Save all Audio as Batch Process”, also in the file menu. Click ok through the first prompt and it’ll bring up a window with all the files being used in that session. At the bottom, click on “Export Settings”. BE CAREFUL HERE – be sure the location is correct. Adobe automatically refers back to the last session you worked on. You will need to Browse in and find the folder that houses your session files. Once you find your folder – make sure the following settings are in place…
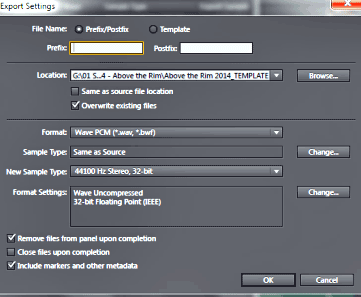
Click ok, then click Run at the bottom of the batch process window. You will see all the files being exported to your external drive folder. Then just close the Adobe project. Click no on any other prompts you get. Here’s a tip, because we share a lot of sessions. If you copy a session onto a new machine or other internal drive, you or the person opening the session will get messages from Adobe looking for specific files. That’s because adobe remembers the root from the computer where the original session was created. Just point it back into the new session folder, find the file in question and open it. You might have to do this several times to open an entire session, BUT once it’s open, Save As back into the new session folder and you won’t have an issue again.
Jeff Augustine, Jeff Augustine Voice Overs: For AA, I'm on AA CS6 on an iMac. Really, the one thing that I do to really speed up (this is nothing new BTW) imaging VO and production is I've created a template session for each station that I do imaging for. You can add all of the processing from the multitrack screen for each track where your VO, beds, SFX go and then export the session as a template. That way, the particular "sound" you have for one station or the other stays consistent each time you voice and do production. And then all you have to do next time you open up AA to do imaging for whatever station you're working on is pick that particular template you've set up for that station and BOOM! It's also much easier to have the processing added all at once in multitrack as opposed to manually adding each layer of processing in the edit screen. It really speeds up the process of imaging production and ensures you get the "sound" you're after each and every time.
Jeffrey Smith, www.jeffmartinvo.com: When editing down commercials, I created keyboard shortcuts to make things easier. Just go under Edit Menu and Click Keyboard Shortcuts.
I mapped my INS keyboard button (just above my DEL button) so that it inserts silence with just one key stroke to the highlighted area you are working on. Great for quickly removing breaths.
I also mapped my N key to automatically Normalize the wave form with just one keystroke.
I also just recently switched my Mouse to a professional Gamer Mouse that lets you program the extra buttons on the mouse to the INS and N keyand the Space Bar (to Play and Stop). I can now edit one handed if I like :)
Randy Spicer, audiotheater.net: Clean audio is essential to insuring that your masterpiece sounds as good as it possibly can, and to that end a feature I rely on heavily for cleaning up audio is the SPECTRAL FREQUENCY DISPLAY. In Adobe Audition CS6 it's a quick SHIFT D in the edit view window to change your screen into spectral view. Using the MARQUEE SELECTION TOOL in the upper left of your screen you can draw a box (by swiping your mouse) over problem areas and perform one of two tasks. Either AUTO HEAL or DELETE. With practice it becomes easy to find lip smacks and other noises that can ruin an otherwise perfect take. This is also a great way to rid a bad track of unnecessary breaths or room noise as well.
Additionally, spectral view can be used to spot problem frequencies. Sibilance shows up in the 5K to 12k area as bright yellow-orange. By using this screen in conjunction with your EQ, you can pinpoint EQ issues with much greater accuracy. It's worth noting that many producers commonly use pre-sets for most of their productions, but it's been my experience that frequency problems are not consistent. They tend to shift from project to project, thus whenever your ears detect a problem... the SPECTRAL FREQUENCY DISPLAY is a good place to start.
Also, even if you use a standard chain for your mic (that may or may not include a multi-band compressor, or a parametric EQ) it doesn't hurt to add a 30 channel EQ strip to the back end of that chain and start with all faders set to zero. That way you’re not really affecting anything... yet. When you identify the problem frequencies, you can then go into this 30 channel strip and pull the problem frequency down into the negative digits. It's amazing how just a few dB can really impact your sound.
Lastly, take a look at the SENDS box at the front of each track. You'll notice that by default the track is always in READ mode. Go out to YouTube and learn how to use the WRITE, LATCH, and TOUCH features. While you won't use this trick a lot, it's great to know how to use it when needed. In short... these buttons allow you to apply changes via your plug-ins, in real time. In other words, as the editor is playing back a piece, you can be adjusting knobs on a particular plug-in, and while you're doing so, the system will memorize those adjustments as they happen in the timeline. As always, if you're unhappy with the experiment, a quick UNDO, and you can try again.
Jose Serato, Production Director, Univision Radio, San Diego, CA: The one feature that I use a lot with my production is the personalized favorites. I have set the letter “h” as a mute key since the letter H is silent. This helps me clean up audio faster than looking for the mute from the drop menu. The other key that I have assigned is the letter “N” to normalize to 98%. These two keys help me edit my audio faster.
Dave Stalker, Production Director, Combined Communications, Bend, OR: I have a few new things that are working well. In some of the more hard sell spots, inverting the stereo phase to place the voice on each side instead of center can be effective, but if you use the Stereo Imagery tools, you run the risk that you may produce a near total cancelling of the audio when it goes through the on-air processing where phase shifts can cause unexpected results. (Believe me, I've done it!) To avoid this, you can achieve the same effect manually by taking the clip you want the effect on, making a copy and dropping on another track, phase shifting one far left and the other far right, and then offsetting them, so they're not exactly above or below each other. The offset only needs to be a fraction of second.
The other thing that's incredibly useful is being to slide content thru a clip to quickly create different versions of a spot. I use it when building station specific versions of the same spot when 5 different calls signs are involved for our radio group. I also use the clip color function, so at a glance you can spot the clip that contains the call signs and line up the one you need. This allows me to create 10 or 20 or more versions of a spot in a very short amount of time. This technique also works when there are multiple groups of sponsors to be mentioned in different spot versions. The timeline can wind up very colorful at times.
Finally, unless you have a totally sound-proof studio, run voice tracks through an FFT filter like Kill The Mic Rumble. I also use Restoration Noise Reduction to sample the ambient noise between words, or at the beginning or end of a recording session. You create a profile that actually shows you the waveform of the noise, then apply the noise reduction to the entire clip. My studio is directly above air-conditioning compressors on the ground outside 1 floor below me and some street noise also creeps in. This technique knocks all that out.
Doesn't everybody do this stuff? I've been here for about 20 months and I've gotten completely anal about method and processing audio the same way for a consistent sound on all our stations.
♦
