by Steve Cunningham
Since summer is nearly upon us (we’re in the second day of 100+ degrees as I write this in sweltering LA), it occurs to me that it may be the ideal time to embark upon a learning project that more than a few production geeks and voice actors have said they would like to try -- namely, how to cut their $(^#* webmaster loose once and for all. It’s not a tough task to set up a web server on your own computer, where you can exercise your need to just do it yourself, and then once it’s right, upload it to a production server or a new hosting plan. Let’s roll up our sleeves, and see exactly how it’s done using WordPress.
Note: We’re going to get our serious geek hats on for this, and I recommend reading your way through the text first, before you begin (especially if you’re on Windows). It’s also probably a good idea that you try these things out on something other than the money machine on which you record and edit audio. A cheap and used PC or Mac is not expensive, and using one will keep you from committing seppuku when something goes sideways, especially during the initial setup. Trust me, it probably will. Happens to me all the time...
STACKS OF SOFTWARE
WordPress is a well-loved platform that allows folks with limited programming skills to put together a killer website with little effort. Here are just a few surprising stats that lead one to this conclusion:
1) 74.6 million sites currently run on WordPress. 2) WordPress is used by 22.1% of all websites, and 59.9% of all the websites whose content management system can be discovered. 3) In 2013, WordPress was downloaded an astonishing 46 million times. 4) 36% of all recently-commissioned web sites are using WordPress. Given the fact that WordPress has been around for over a decade, has a huge and diverse support community, and is clearly the most popular web development platform out there for a couple years running, it makes sense to use it. It doesn’t hurt that it is also the easiest platform on which to build a new site.
It also happens that what is required to make WordPress sing and dance is minimal. An installation consists of web server software (usually Apache) to field and process HTML requests from site visitors; a scripting language called PHP, which builds the page structures in real time; and a database to store and deliver the actual page content (text, pictures, audio files, and so forth, usually using database software called MySQL). Since the PHP software and database software are somewhat complex and opaque, a management program known as PHPMyAdmin is also customarily installed, and provides a friendlier user interface to reduce the complexity.
And yes, all four of these software packages are free to download and use, as is the WordPress software itself.
So if one downloaded and installed the four programs on a Windows or Mac computer, one could then conceivably install the current version of WordPress on top of them and make it go. One could indeed do that manually, one package at a time, provided one knew exactly where to install each of them in the directory structure of the hard drive, and in what order to install them. That information is readily available on the web, but it’s far too much trouble. Instead, the tasks can be accomplished with one or two clicks using what is known as a software “stack”.
XAMPP, WAMP and MAMP
There are several products available that will automatically install the entire “stack” of items needed, with everything in its correct place on the hard drive. Most of these stacks are free, although some charge a modest amount for a user interface that makes all the processes more transparent. We’ll start with Windows; note that all stacks currently support Windows Vista and later -- Win XP and Server 2003 are specifically NOT supported.
On the Windows platform are stack installers including Xampp (which is also for Mac, hence the “X” which indicates its cross-platform nature), and WAMP (which stands for Windows, Apache, PHP, and Perl). But my personal favorite is called WampServer <www.wampserver.com>. WampServer puts a friendly face on the four programs, and when you click the download panel you are actually taken to SourceForge, the repository for many open source software projects, where WampServer will deliver either a 32-bit or 64-bit version of the WAMP stack. In addition to the aforementioned software packages, WampServer will also install SqlBuddy and XDebug, additional tools that you may find useful over the longer haul, but for now just install the entire package to the suggested C:/wamp location.
I wish I could tell you this will work without any failures, but the fact is that all of the stack programs on Windows require some workarounds. In the case of WampServer, it requires several installs of Microsoft C++ runtime libraries, as detailed in the first entry of WampServer’s forum <http://forum.wampserver.com/read.php?2,123608>. It’s a pain to go to Microsoft’s site and collect these things, but at least they’re not hard to find.
The XAMPP <www.apachefriends.org> install is substantially easier and there are no extra files to install. After the install you’ll want to allow the components to talk to your local network but NOT allow them to talk to the Interwebz in general, since there are too many exploitable holes in the XAMPP stack. You’ll be prompted in Win Vista, 7 and 8 to allow local network connections and disallow outside connections. Just do it.
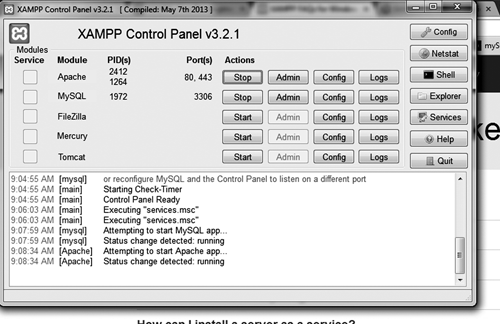
The Control Panel is simple and straightforward, although it doesn’t include pHpMyAdmin on the local install -- if you click the Admin button for MySQL it will get that program from the interwebz, which does imply that there may be some potential security holes as mentioned. Otherwise it’s pretty much perfect. Check that your install works by opening a browser and pointing it to <http://localhost> or <http://127.0.0.1>. By the way, should you choose to, you can download the WordPress module from Bitnami, the folks who offer XAMPP. You’ll find links on the right side of the XAMPP Downloads page -- if you’re using their WordPress installer then you can skip to the WordPress section below. Your WP installation is in C:/xampp/apps/wordpress/htdocs -- go check it out, and you can pull up your install in a browser at <http://127.0.0.1/wordpress/>.
On the Macintosh side you will find MAMP <http://www.mamp.info>, which stands for Macintosh OSX, Apache, MySQL, and PHP. This software comes in two flavors: the first is regular MAMP, which contains the four basic elements and all ancillary files, but with only a command line interface to start and stop the various services. This is workable for a dev-in-training with a limited budget. Having said that, the MAMP PRO version is superior in almost every way, especially with its complete and convenient control panel. The installation is quick and brain-dead simple, and everything will end up where it’s easy to find and use (your site files will go in the /htdoc/ folder which is inside the MAMP folder). Believe me, it’s the best sixty bucks you’ll spend on your potential web career, and let’s face it -- your web designer can burn through that much of your money just changing the copyright year from 2013 to 2014 on your site. Please do it if you’re on a Mac. Soon on Windows as well...
...because there is a MAMP for Windows coming, which is currently in beta. I obviously have no experience with this product, but the coders who produced MAMP are serious pros. Frankly, I’ll remove WampServer and/or XAMPP the minute MAMP for Windows comes out of beta. It’s that good, and the others all have some problems that will give you a slight headache during the installation process. I’ll just wait for it.
INSTALLING WORDPRESS
Assuming you’re not using XAMPP, you’ll need to install a copy of WordPress. Go to <http://wordpress.org> (Note: NOT wordpress.com!> and download a copy. It is free, and will come down as a .zip file. Hang on to it for a minute; we have a couple things to do first.
First, find their “handy guide” which is the 5-minute installation at <wordpress.org/download/>. The actual instructions are at <codex.wordpress.org/Installing_WordPress>. As explained there, all you need is a text editor and a browser. Forget about the FTP stuff, since you’re going to install WordPress in a local folder. Typically web files go into the aforementioned /htdocs/ folder. On Windows this will likely be in the same folder as the stack application, such as C:/wamp or C:/xampp. On the Mac it will be in the MAMP folder, or you can also use the /Library/Web Services/ folder, but the easiest thing will be to just use the default.
The toughest thing you’ll need to do is to create a database in MySQL. This is where PhpMyAdmin will save your posterior. As shown in the WP install page, you can create a new database, and a new user with all the privileges and a secure password, from inside PhpMyAdmin. Make sure you write down the name of the database, the name of the user and the user’s password, ‘cause you’ll need them. Just follow the instructions on the WP install page, and Bob’s your uncle.
Once your mySQL database is running, you can fire up your browser and finish the install by going to <http://localhost/theWPfolder/ and the installation script will run on its own. Remember, you’re installing everything on your internal hard drive, so there’s nothing to upload anywhere. Once you’ve installed it all, you should be able to visit http://localhost/wpfolder (where wpfolder is where your copy of WordPress resides) and see your site.
OOPS!
If something goes wrong, who cares? It’s on your local computer and you can delete it all and try again. If something crashes, it’s the same -- just delete and try again. Should you run into serious trouble, you can always check the encyclopedia of all things WordPress documentation, at <http://codex.wordpress.org>. In a pinch, send an email to
Next month we’ll unravel any difficulties you may have had (do send me an email describing what blew up for you), and we’ll go further into how we can turn a WordPress blog into a web site that even your agent will like. And we’ll do it with as little code as possible. We’ll also correct any errors, cover security, a backup strategy, and whatever else you need to know to fire your webmaster. Unless you’re married to him or her, or something equally dodgy... have fun!
♦
