GETTING STARTED
Setting up the system was simple. I connected the video monitor, keyboard, and mouse to the PC, and plugged in AC. Next I attached the included four-channel AES fan-out snake to the DB-15 connector on the DIO card, and connected the XLRs carrying the AES in and out signals to the appropriate connectors on my console. I then connected the Master Control Panel to the CAT card and to its inline power supply, and I fired up the PC.
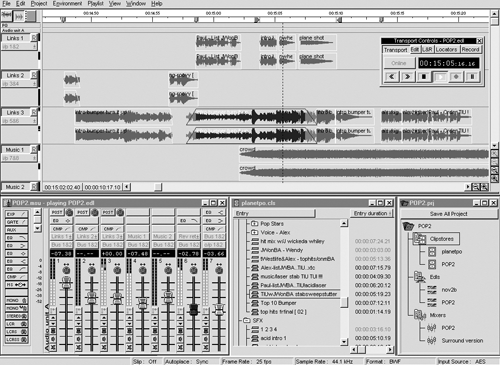
After going through its diagnostic routines, the PC plops you in front of the familiar Windows desktop interface. Double-clicking the SADiE4 icon at the left fires up the program. You’re first presented with a choice of opening the last project you worked on, starting a new one, or browsing for another. When you’ve picked one, you’ll find yourself looking at the main windows — the Playlist window across the top, and the Mixer, Transport, Clipstore and Project windows organized along the bottom. Each of these (with the exception of the Clipstore and Project windows) has a toolbar of icon-buttons running across the top, and these do most of the work.
The windows are all self-explanatory, although SADiE uses some home-brewed nomenclature to describe things. While a track in SADiE is what you’d expect, a whole, original audio recording, when placed in SADiE’s Edit Decision List it becomes a “stream.” A stereo track uses two adjacent streams, while a mono track uses only one. The RADiA system can playback a total of 24 streams, which is the equivalent of 24 mono tracks, or 12 stereo tracks.
The graphical interface for the RADiA is highly customizable, and this is a good news/bad news situation. The good news is that you can set up the SADiE desktop to display only those windows and icon-buttons you really need. The bad news is that you’re initially forced to spend time doing this, or you’ll end up searching everywhere for buttons and controls that aren’t apparent on the screen; more on that later.
Setting up to record requires a trip to the Settings window, where you’ll find all the options you’ll ever need and a few that you may never need. Since the SADiE software used in RADiA is identical to that used in the company’s high-end post workstations, you’ll see settings for machine control, synchronization, 9-pin, and so on. Just ignore all that stuff. You’re interested in settings labeled General and Audio and Mixer to specify your physical inputs and outputs, bit- and sample rates, and exactly where you want things stored on disk. Once set, you can store all these settings in Templates, and with these you can have RADiA create new projects with everything done just so.
Now arm a couple of tracks and hit Record. If you’ve enabled the Waveform display in the Playlist window, you’ll get a visual indication of your audio as you record it. Note that the tracks default to mono, although you can merge adjacent mono tracks into a single stereo track by right-clicking on the first track and selecting the Merge Into Stereo option.
GET YER TOOLBARS HERE
While most editors have toolbars with buttons and also have corresponding menu items, the SADiE software eliminates the menu items altogether, with the exception of the customary Cut, Copy, Paste, and Undo (up to 25 steps can be Undone). As a result, it is important that you take the time to explore the Toolbar menu under the Views menu and set things up so they work for you.
The Toolbar options work like the toolbars in Microsoft Word. The initial setup has a minimal number of icon-buttons in each of the toolbars, and you’ll want to add more. For example, if you want to make a cut and have the remaining audio ripple to close the gap, you’ll need to select the Slip option for the Playlist Toolbar. When you do, the three icon-buttons that control Slip will appear in their own little windoid. You can then use them as they sit, or drag them as a group to the main Playlist toolbar, where they’ll stay forever after. There are several more must-have buttons that you’ll want on your Toolbars, and you’ll discover them as you go along.
Incidentally, the necessity of turning the Slip function on and off is not particularly unusual in several audio editing programs. Case in point, in ProTools you must select an Edit Mode that will control the behavior of your cuts. In Shuffle Mode, regions within a track always snap end-to-end so the gap will close by itself, while in Slip Mode the regions will stay put after a cut, leaving an empty hole. Neither approach is elegant, but we’ve become accustomed to working this way.
MIXING AND EFFECTS
The Mixer window has all the functions you’d expect, and includes segment-based automation for faders, pans, and mutes. Each channel strip also has four Process Slots for inserting EQ, dynamics (compression, expansion, and gating), aux sends and returns, and even an MS decoder. The EQ is versatile, with lowpass, highpass, shelving, and bandpass versions available. All these come standard with the software.
In addition to the standard plug-ins, you can also buy third party plugs (including Direct X plugs) to extend RADiA’s capabilities. SADiE will sell you plugs that include a de-esser, graphic EQ, and a mastering limiter, as well as high-end items like Apogee’s UV22 dithering CD encoder, SyncroArt’s VocAlign, and the entire suite of Cedar Audio noise reduction software including DeNoise, DeCrackle, DeClick and DeThump. Mind you, a full Cedar set costs nearly as much as does the RADiA Turnkey system, but it’s there and available.
