by Jerry Vigil
 Hold on to those grease pencils! Don't toss that reel of tape! Analog is alive and well in the digital nineties! Combining the latest advancements in analog recording with today's microchip magic, Otari brings analog recording up to date with the MTR-15 2-track recorder.
Want to convince your engineers the MTR-15 is the right machine for your studio? That's easy. This paragraph should do the trick. Alignment and calibration procedures that would take a GOOD engineer a half-hour to complete can now be done by your receptionist in about sixty seconds, with computer accuracy! A pop-up door adjacent to the VU meters on the MTR-15 accesses the unit's Alignment Panel. A few quick selections from the menu on the LCD display initiates the alignment program which was originally developed for Otari's top-of-the-line multi-track recorder, the MTR-100A. Hit Play and Record and the unit will automatically set levels, EQ, phase compensation, and bias, all for the particular kind of tape you happen to have on the machine, at the particular tape speed you happen to have selected. If you want it to, after the short alignment procedure, the unit will automatically shift into reverse, erase all the tones it placed on the tape, and stop at the point where you started, ready for recording on clean tape. Want to save those settings for, let's say, Ampex 456 at 15 ips? No problem. You can store up to sixteen settings in the MTR-15's memory. (The MTR-15 accepts four different head assembly types, and each head stack has its own sixteen memory locations for storing settings.) Of course, you have the option for the alignment to be only partially automatic or completely manual if you prefer. The options available for the alignment of the unit are numerous. We'll spare you the technical jargon and simply say that the automatic alignment feature of the MTR-15 is the best thing to come along since ITC's ELSA (automatic azimuth adjust, erase, splice locate) function on their 99 series cart machines.
Now that your engineer loves the machine, let's take a look at what it can do for the prodo guys and gals. One unusual item on the control panel is the silver Cue Wheel among the transport controls (something seen more often on digital recorders). The SHTL/JOG button next to it switches the function of the wheel between the Shuttle mode and the Jog mode. In the Shuttle mode, the tape moves forward or backward at a speed proportionate to the amount the wheel is turned in either direction. A quarter-turn in a clockwise direction sets the machine into a fast-forward mode. Another quarter-turn increases the speed. The wheel must be turned the opposite direction to stop the machine. In the Jog mode, movement occurs only as long as the Cue Wheel is being turned. The faster you spin the wheel, the faster the winding. Stop spinning the wheel and the tape stops. Cuing a tape in the Jog mode seems a little clumsy at first and takes getting used to (no more so than with the wheel on a digital editor), but it effectively works to cue audio sufficiently without touching the reels.
A 2ND FUNCTION button on the panel is a blessing for those of us who do way too many agency dubs. Don't you hate threading up a reel only to find it has been wound tails out? You switch the reels and thread it up again. Then, when you're through with the dub, you have to switch the reels once again for the next dub that's heads out. On the MTR-15, pressing the 2ND FUNCTION and PLAY or STOP buttons reverses the playback. Tails out dubs? Piece of cake! Why didn't they call it the REVERSE button? You guessed it. The button serves more than one function. More on that later.
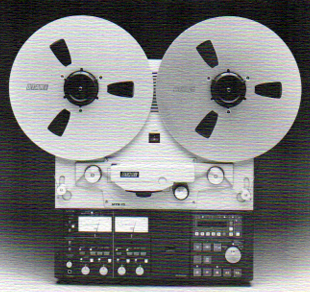
The picture shown is the model MTR-15-N. The model we actually played with is the MTR-15-NM. The latter model comes in a roll-around cabinet complete with a place to put your edit pencils and splicing tape. This "NM" model also comes with an external meter bridge instead of having the meters actually in the unit as shown in the picture of the "N" model. If the unit looks small, don't be too deceived. Those are 12.5 inch reels!
The Transport Control Panel offers the usual STOP, PLAY, RECORD, REWIND, and F.FWD buttons. You also have an EDIT button for "dumping" tape when editing. A CUE button retracts the tape lifters and lets you hear audio on the tape when in the Fast Wind modes. When pressed, the audio output is attenuated and high frequencies are rolled off to protect your speakers (not to mention your ears).
If you can see it on the photo, one of the transport buttons is unlabeled. The function of this button is assignable and can perform one of four different tasks. 1) It can enable the Fader Start function of the unit if the optional Fader Start kit is installed. 2) When pressed, the Review function is enabled, and the tape can be monitored in rewind "spooling" speed. When the button is released, the unit enters the PLAY mode. 3) There are three memory SEARCH buttons above the transport controls. The assignable transport button can act as a fourth cue point. 4) When Search Start is the selected function, the button causes the machine to search for the last point at which the PLAY button was pressed.
