SET ‘ER UP
The first step in creating a voXover session is to create a folder structure for your dialog. A Section folder normally contains the dialog lines, and can be created in the leftmost column of the Session window using the Script menu or the drop down menu displaying the gear icon. You’ll notice that you can also create a Group folder under the same menu — VoXover lets you organize multiple Section folders under a single Group folder. I suspect this will be more useful to videogame folks using multiple scripts and scenes, so we’ll ignore this.
If you want to record extemporaneously (meaning we don’ need no steenking script!), then you can simply create the Section folder, which by default will create one empty line. From the Script menu choose Run Script, and you’re recording wild. But here’s the more conventional approach, using a pre-written script, which can be either a plain text file or a Rich Text Format (RTF) file.

If you are acting as the copywriter as well as the session engineer, you can simply type lines of script into the session manually (although you won’t want to). A better method is to import your script into voXover, but first you’ll want to create one or more characters (or actors) using the Properties button. Clicking this brings up a dual-list dialog box where you can enter the talent name on the left and the character name on the right. You’ll want to do this even if you’re working on a monologue and the character is called VO, because imported lines must be assigned to an actor.

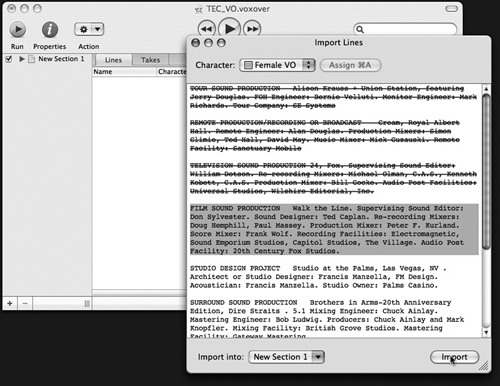
When you select the Import Lines item under the Script menu, voXover shows you a dialog box from which you can locate your script on your hard drive. You choose whether to select the script text manually, or to import it automatically. Using the automatic functions require that your script be formatted either as a table from Microsoft Excel, or as a native VoicePro-format text file. (VoicePro is a competitive product made by Gallery Software, and is one of the more-expensive alternatives mentioned above). The manual selection process is very simple, and quite adequate for most commercial and imaging copy since there isn’t that much text.

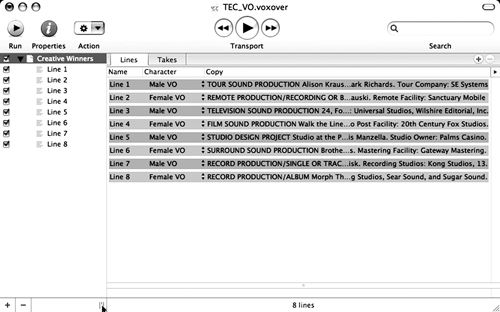
Clicking the Open button will display the script in the Import Lines dialog box. Just highlight the first line or paragraph you want to import, and assign it to an actor using the Assign button at the top of the window. Assigning a character to the selected line highlights the line in the character’s color. Then use the Import Into... selector at the bottom left to choose a Section for that line, and click Import. The line will appear in the session, inside the Section folder you chose, and the imported line will change to strike-out text in the Import Lines window so you know it’s been done. The checkboxes to the left of the Section and line entries mark which lines will be displayed to the talent, so you can omit some if you need to. Continue importing lines until you have them all — it takes longer to explain it than to actually do it, believe me.
Once you have it all, your session window will look like the screenshot shown here [Lines Window - page 13]. What you can’t see clearly is that alternate lines are colored differently, since they will be spoken by different characters. It’s all quite well-organized, and now it’s time to record.
GIT ‘ER DONE
Here is where you’ll want to activate the second screen if you have one. Typing Apple-F brings up a list of Sessions currently open on your local network, including the current one. If you have a second monitor connected to your computer, then you can use the “Display on Monitor” drop-down menu to cause your second monitor to display the script in full-screen mode. If instead you have a second computer, you can run voXover from it and display the script full-screen that way. Note that while having a second screen or computer for voXover is nice, it is not a necessity as it is on the VoicePro software — it’s just provides extra coolness.

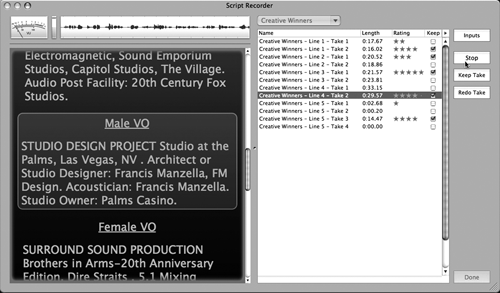
Selecting Run Script from the Script menu brings up the Script Recorder. On the left you’ll find the script, with metering and a small waveform display above. The right side contains the takes, along with buttons to configure the source input, start and stop recording, and mark good takes. The entire window can be resized freely, so if you’re working alone you can make the script really big and easy to read. Once you start recording, the current line is displayed on the left, surrounded by a yellow halo. The program beeps once, the yellow halo turns red, and it records. You can turn off the pop if you wish, but it helps you (and the talent, which may be one in the same) keep track of what’s happening. When the input signal goes silent for two seconds, as the talent finishes the line, voXover saves the recording as a take, pauses for three seconds, advances the script one line and beeps again indicating the beginning of another take.
The above describes the default behavior of voXover, but you can change many of these behaviors via the Section Settings menu under Scripts. You can define what the program should consider as “silence,” how long it should pause between takes, how many takes it should record or if it should wait for you to manually indicate another is needed, and so on. All takes are automatically named according to the settings you specify, and can be stamped with the date, time, character name, take number, or other label of your choosing. Finally, you can mark takes as keepers and even rate them with stars, much like iTunes. Keep in mind that these preferences are per Section, so you can have a different pause time for different Sessions or actors. It’s all very flexible.

Once you click the Done button in the Script Recorder, you’re back in Session window looking at the Takes tab. Here you can review the takes using the big transport buttons at the top of the window. You can also rename the good takes or delete the bad ones, or use the Rename Takes menu under Script to rename all files as a batch operation. When you have decided on the best of the best, you can then export the files for use in a multitrack editor.
The Export function is far from being a simple “write these files to disk for me” operation. You can pick just highlighted takes, or select them according to whether they are marked “keepers” or even the number of stars you gave them. You can have voXover top and tail trim the files according to a level threshold you set, and can add silence (“pad”) the beginning and end. Exports can be WAV, AIF, SDII, or other formats from 8- to 32-bits.
DOCS, SHORTCUTS, AND A WRAP
As of this writing there is no documentation, although according to the guys at Audiofile Engineering, the PDF manual and several streaming video tutorials should be online by the time you read this. This doesn’t concern me, and I have to say that half the fun has been seeing how much of this software I could figure out without benefit of documentation. I suspect I’ve got just about all of it.
Almost all the menu commands are available as keyboard shortcuts, all of which are re-configurable. The sample rate and bit depth of your recording is entirely dependent upon the settings your interface currently uses. VoXover is capable of 32-bit quantization. What is more important here is that it did not crash, which is more remarkable considering that I have been evaluating version 1.0.0 that has been online for less than a week.
I can see VoXover as being a godsend for voiceover talent working alone at home and self-directing; it has worked that way for me. Once you have your script loaded in and have the Section settings the way you want them, you can basically relax and really concentrate on delivering good performances. I found that by setting the program to automatically record three takes before advancing to the next line, it forced me to develop and deliver three different approaches to each line. This gave me more choices to send to my agent or the client, and I believe my performance was improved.
Audiofile Engineering’s voXover software is currently available at the introductory price of $375. Owners of VoicePro or other competing software can get a competitive upgrade for $325. For more information worldwide, visit www.audiofile-engineering. com.
♦

