 DECEPTIVELY SIMPLE?
The AlphaTrack is deep in terms of its functionality, although you’ll get the basics working right away. The Transport buttons are the transport buttons, and work as one would expect. The same goes for the fader, along with the REC, SOLO, and MUTE buttons. After that things get a bit more complex.
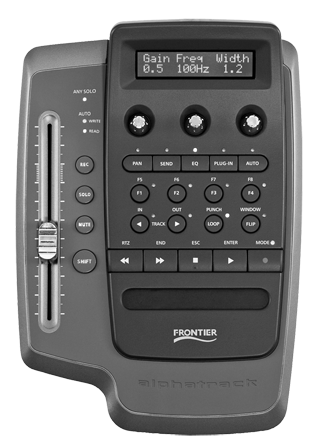
AlphaTrack’s display shows you up to three adjustable parameters. Which three you see depends on which of the five Mode buttons, found just below the knobs, is active. Each has a yellow LED just above it to make sorting that simpler. On startup, AlphaTrack defaults to the Pan mode, so the display shows the track name, and both Marker and Pan labels across the top row, and the current Marker number (which will be “1” in a new session) along the bottom row. When you touch the left knob, the display changes so that the track name is in the upper left, and the label “Track” is at the bottom left — all else is blank. If you turn that first knob, you will quickly scroll through all the tracks from top to bottom (or left to right if you’re viewing the Mix Window). The track name displayed is actually the first track in a group of eight tracks going to the right, since that’s how the HUI spec works. Right-clicking on a track with the mouse will force AlphaTrack to snap directly to that track (on the Mac, control-click and select “Scroll Into View”). It all happens pretty danged quickly.
Remember, the detented knobs are touch-sensitive, so if you need to simply examine a parameter’s value without changing it, all you have to do is touch the knob. The encoders also sense velocity, so turning a knob slowly lets you dial in a parameter with reasonable precision (although the detents sometimes get in the way). But give the knob a hard crank to either side, and the values will increment or decrement at a much higher rate. It’s not difficult to get from viewing track one to viewing the master fader past track 24 in one good twist.
Additional key commands are available courtesy of the Shift and Stop buttons. In Pro Tools, for example, if you have a track selected with an Aux Send applied to it, just grabbing the fader will control the track volume, the value of which will be simultaneously reflected in the display. Press the Flip button, and the fader will control the Send level instead. Hold Shift and press the Flip button, and your computer display will toggle between the Edit and Mix windows. Hold the Stop button and press Flip, and Pro Tools’ Transport window will appear or disappear from the screen.
Likewise you’ll press REC to arm a track for recording. Holding the Shift button and pressing REC clears all armed tracks, while holding Stop and pressing REC will Save your session. As you can see, the parameters stack up quickly... and remember that they’re at least somewhat different for each software editor you want to use with the AlphaTrack.
SCRUB-A-DUB
One control we’ve only mentioned briefly is the Touch Strip. Located below the Transport buttons, I initially thought this was some decorative indent when I first saw it. In fact it’s one of the “funnest” controls on the entire box.
The touch strip ribbon actually has the ability to distinguish between one finger sliding across its surface — initiating jog mode — or two fingers spaced slightly apart, which engages shuttle mode. As I’ve used it, I’ve found it faster and more intuitive than a wheel or mouse. Sliding both fingers slightly to the right shuttles the time line slowly in that direction. Slide your fingers further to the right and the time line moves faster. Slide your fingers to the left to slow things down or go backward. Lift one finger and precisely scroll the playback to where you want it with the other finger. While this all happens silently, in Pro Tools pressing the F3 button lights its LED and makes jog and shuttle audible, as well as scrub. The audible scrub seems to roll through about half a second in one pull left-to-right on the strip, while jog accelerates to real time and shuttle plays at several times that speed.
Further, if you have markers in your session, then holding Shift and tapping quickly on the right end of the strip advances the cursor to the next marker location. Tapping the left end of the strip jumps back to the previous marker. Brilliant, and quick. When Shift is held, the Play button doubles as the Enter key on the keyboard, allowing you to drop markers on the fly. The combination makes navigation a lot quicker for me.
It may take you a minute to get used to the touch strip... it did me. It requires but a light touch to get things moving, and you’ll get a feel for it quickly enough. Once you do, the one-finger versus two-finger drag for navigation is well worth the price of admission.
Plug-ins are also controllable, or at least the native Pro Tools plugs are supported. Pressing the Plug-in mode button allows you to access any function that is automatable in Pro Tools, which is nearly all of them. When in Plug-in mode, you use the leftmost encoder to select the insert containing the plug, the center knob to select a parameter, and the rightmost plug to adjust the parameter value.
Each of the knobs has a switch beneath it that allows further control, so for example pressing down on the rightmost encoder will bypass a plug-in. Okay, it’s not as cool as having a Digidesign ICON console, but it carries nowhere near the cost, either.
Although I’ve used Pro Tools examples thus far, I can also tell you that the AlphaTrack is equally adept at getting round in Audition 2.0. The main difference is that there are fewer commands available, as the Stop button is not used as a modifier. Also different is the operation of the touch strip — one finger still scrolls in either direction, but two fingers zoom the display horizontally in and out. Adding the Shift button to the two-finger salute zooms in and out vertically. All the EQs are adjustable using the encoders, and the F2 function key lets you quickly jump from Multitrack to Edit and back.
 WHAT DIDN’T YOU LIKE?
There’s always room for improvement, and there’s a bit here too. The buttons are all a bit plasticky and clicky, and I would kill for rubber buttons at the transport positions (doesn’t anybody make nice non-skid rubber buttons anymore?). The USB business is troublesome, but I don’t know if there’s much to be done there short of creating an AlphaTrack II that connects via Ethernet. Some folks on the net claim that Presonus’ Fader Port has a nicer fader, but I don’t like the button layout nearly as well, and am quite satisfied with the fader on the AlphaTrack — it gets the job done.
The documentation is well-written and all on PDF. While Frontier thoughtfully makes it available to the public on the company website (and you should download it before you buy), you’ll definitely want to print it out — there’s way too much information there to rely on memory, and you’ll want to have the paper handy.
I certainly like the AlphaTrack well enough to keep it. It sits nicely to the left of my computer keyboard, and feels like it’s been there forever — it’s that natural to use. Moreover, it’s really fun to use, and has made me quicker in Pro Tools — which is, after all, the point. Frontier has evidently spent a great deal of time on ergonomics, since everything is clearly labeled and easy to manage. The software is brilliant in how it presents a lot of function in a small package. The AlphaTrack is a winner, and they’re not getting this one back.
The AlphaTrack from Frontier Design carries a suggested retail of $249.00 in the US, and the street price is around $200. For more information worldwide visit www.frontierdesign .com.
♦

