HONEY I’M HOME
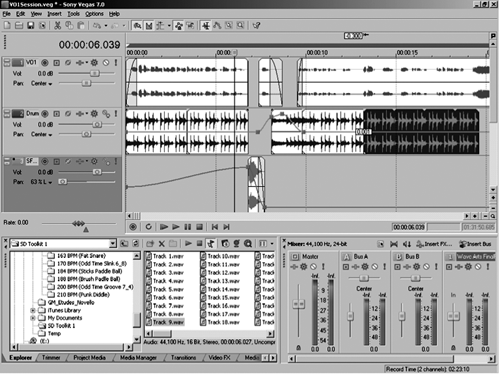
However, once the main window opened I felt quite at home. Sony hasn’t changed Vegas’ basic interface, which still bears more than a passing resemblance to Sound Forge and organizes everything you need in one window. I recommend that you setup some preferences before you get into the good stuff. First stop is the Project Properties window, which can be found under the File menu. Here you can set Audio Properties (and Video as well) and Ruler units, among others. Besides sample rate and bit depth, Properties include Resample and Stretch quality, which defaults to Good — change it to Best unless you like artifacts. You can also set a master Recorded Files folder for clips you don’t put into their own folders, decide whether you want to work in stereo or 5.1 Master Buss modes, and set the number of stereo busses that will be made available. More busses is more fun, but also more memory.
The next stop is the View menu, where you can create and save your favorite window layouts so once you learn the program you can personalize it. While Vegas always displays tracks in the upper half, the lower half is highly customizable; in particular the lower left quadrant features a Window Docking Area (WDA), with tabs that will show a File Trimmer view, the Media Manager view, and a standard Windows Explorer view. The fastest way to access these is to create presets and recall them by pressing Alt plus the preset number.
The third stop is the Options menu where you can access the Preferences page. There are twelve sub-pages and a gang of choices within those, but you will have to choose your Audio Device before you do any sound work. You will also want to show Vegas where it can find your third-party plugs if you have them. Like Acid and Sound Forge, Vegas can use VST plug-ins as well as Direct X ones.
Did I mention that the main page is easy to understand? There are four main areas under the Windows toolbar: the Track List, the Timeline, the aforementioned WDA. The Track List lives on the left-hand side and contains all the track controls such as record arm, phase, FX, automation mode, mute and solo, plus horizontal faders for volume and pan. The pan fader also performs other functions, chosen from a drop-down menu, such as controlling auxiliary send levels. When you arm a track for recording, a level meter and input channel appear.
Each track has a Minimize Track Height and a Maximize Track Height button so you can open it to full height for editing, then squeeze it down again. Alternatively, you can grab the dividing line below a track and stretch or shrink it by dragging. This makes it easier to squeeze a lot of tracks into limited screen space and still have access to the most important controls for mixing. Right-clicking an open area within the Track List lets you to add and delete tracks, rename them, view envelopes and switches, and so forth.

