It’s interesting to compare this method of increasing loudness with what can be achieved with a conventional limiter. The Inflator can actually provide useful loudness increase even when used after a limiter, but the increase will be less. And of course, the peaks lost by the limiting cannot be recovered afterwards.
Since the Effect Level control adjusts the increase in perceived volume, the trick is to use as much as you can without compromising the tone of the track or adding unacceptable distortion. You can then get a further increase in loudness by switching off the Clip 0dBr button and using up some of the soft-clip headroom. The manual suggests the best results are usually achieved by setting the Effect Level to maximum and then adjusting the input level and Curve controls for the best subjective results. And the Curve control affects both the perceived loudness and tonal quality of the track.
At its minimum setting, the amount of loudness enhancement is quite small but some “enhancement” still takes place, mainly adding an impression of warmth. When used on a mix, the louder elements stand out more and the overall sound is tightened up, which is useful when trying to lift the VO out of a mix. In analog terms, this is similar to expansion, but without the side-effects.
Note that the inflator will only process cleanly any output overs when the Band Split button is off, and with the Effect control at maximum setting. Reducing the Effect control or operating the bandsplit function will always produce higher levels and will force you to reduce the output gain, which of course defeats the aim of maximum loudness.
Loudness enhancement should always be the last thing in the signal chain, whether you use it on a single VO track or on your entire mix. Putting EQ or compression after it may ruin its effect, cause distortion and accentuate any artifacts. And while it’s okay to use it on single tracks to fatten or add weight to a VO, and then use it again on the mix buss for loudness enhancement, you don’t want to use two Inflators directly in series on complex material lest you end up with artifacts.
Note that the Band Split mode is intended to add weight and presence to complex mixed music, and isn’t primarily intended to increase apparent loudness significantly. Also note that sounds consisting almost exclusively of extreme high-frequencies will highlight the added harmonic artifacts created by the Inflator, and probably won’t sound good.
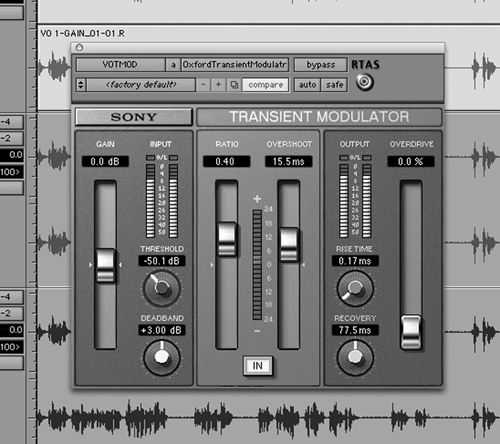
TRANSIENT MODULATOR
Transient modification is not a new concept. When you think about it, engineers have shaped the transient response of music since the introduction of attack and release controls on compressors. What is new is the proliferation of hardware and software devices that take that concept and control to new levels.
Sony’s Transient Modulator (or TransMod) lets you modify a signal’s dynamic level by adjusting the relationship of transients within the track. This can be approached in two ways: to emphasize the transients in the program, or de-emphasize the same events in the track in relation to the rest of the material.
Like the Inflator, the TransMod is standard-issue Oxford plug-in blue with clearly marked parameter controls. The usual suspects (gain control, threshold control, input switch and I/O meters) all function as you might expect. The other controls are specific to TransMod’s operation. The Deadband control manages the range in which transient variations are ignored. A Ratio control monitors the overall effect in regard to raising or lowering the transients within the program.
The Effect meter displays the peak overall gain and loss of transients. The Overshoot control determines the period of time the transients will be modified... for example, a short overshoot period will affect only the leading edge of a transient. The Recovery knob controls how quickly the levels return to normal. An Overdrive control adds harmonics (read: distortion, yet again) that can be added to the output signal. Rise Time controls how quickly transients are detected, and lets you either ignore the shortest transients or affect them all equally.
Setting the ratio to a positive value can dramatically increase the gain of a signal. For example, when the ratio control is set to +1, an attack that has a peak of 10dB gain will produce a level of 20 dB at the output, so use this with caution.
TransMod really shines when it comes to fixing over-compressed production tracks and pop songs for promo use. In every case, I could make the music seem more present without making it substantially louder in the mix. The TransMod proved itself very useful in the fix-it and creative categories, and it’s earned a spot in my plug-ins folder.
IT’S ALIVE!
As you might have noticed, I’m really stoked about the Inflator, while I find the Transmod a useful (if somewhat less exciting) tool, especially for fixing squashed music beds. But both are worthy of a good test drive.
Inflator really does make everything sound bigger and louder, but it does so in a “musical” and not too overstated way. Comparisons with compressors and expanders fall down because there are no time constants involved and so there’s no pumping, and there’s almost always a positive tonal change that accompanies the increase in level. I used the Inflator on complete imaging spots to make them “pop”, but I also found it really interesting on voiceover tracks. I have a feeling that this is one of those plug-ins that the more you use it, the more reluctant you’ll be to work without it, so if you are a Pro Tools or Powercore user, you’re probably going to want it.
Both the Inflator and the Transient Modulator carry a suggested retail price of $495 for Pro Tools TDM, $210 for Pro Tools LE and m-Powered, and $395 for Powercore. For more information worldwide and for demo versions, visit www.sonyplugins.com.
♦
