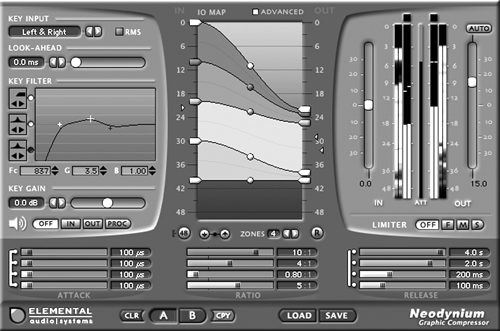
THE MAP
The center of Neodynium’s display is home to the IO Map, a graphical representation of the current compression settings. The Map has a scale for input level on the left, and another for output level on the right. In the default mode, there are four black lines running across the display at 10dB intervals. Corresponding colored tabs (input flags) point to these lines, and dragging the flags lets you set the Threshold for each of the four volume ranges. Four sliders below the IO Map allow you to set the Ratios directly as you would on a normal compressor. Clicking the ADVANCED button above the IO Map enables four output flags on the right, and a small circle (the drag node) in the center. Just below IO Map is are a couple of buttons and a display that show the number of zones active – you can set this from one to four. With just one zone you effectively have a normal compressor, and I suggest you start there to get a feel for how Neodynium works before you add additional zones and complicate things.
When you’re in BASIC mode (with the ADVANCED button off), you adjust your maximum input level by adjusting the white flag, which is the topmost flag on left side of the Max I/O Line. Moving the gray flag, which is topmost on the right or output side, adjusts the output level of all zone outputs in tandem. Dragging any of the flags below the top white one defines where one zone ends and another begins. While you’re doing this, all zones’ ratios remain the same, so to adjust their ratios you’ll use the sliders below the Map.
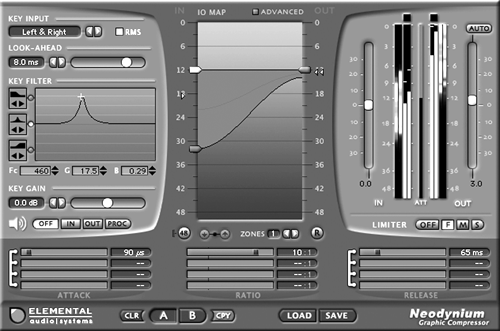
There’s a lot of interaction between the zone flags and the Ratio sliders in Basic mode, and changing the Ratio of one zone can cause the output of another to shift. I found this interaction confusing, which is why I recommend using the ADVANCED button straightaway, as it gives you complete control over the input Thresholds as well as the output levels of all zones directly. In ADVANCED mode, you adjust your maximum input and output levels by adjusting the white flags located at the top on the left and right side, respectively. Grabbing the Drag Node in the center raises and lowers the threshold on both sides at once, while maintaining the Ratio throughout. On any given zone, you can set the input Threshold lower than the output level, which will give you a Ratio on the corresponding slider below that is greater than 1:1. Setting the input Threshold higher than the output level will give you a Ratio that is less than 1:1, effectively turning that zone into an expander rather than a compressor.
Just below the IO Map are two buttons, each with an up or down arrow on it. These are the Linking buttons, and they greatly affect how the zones and ratios interact. When the Down Linking button is active, then adjusting an input or output flag causes the flags below to move in proportion. The Up Linking flag has the same effect on the flags above the one being moved. When both Linking buttons are active, then all flags move together. These possibilities can have an effect on the Ratio for other zones, but linking makes it quicker to set up complex compression schemes.
Additional buttons at the bottom of the IO Map include a button for setting the scale of the map, and your choices are 24, 48, and 80 dB as full scale. And on the lower right is a button with a big “R” on it, which is the Reset-please-I’m-totally-lost-now button. It’ll get you right back to go.
Finally, the attack and release controls are simple sliders in the lower third of the panel. Attack is adjustable between 20 microseconds and 500 milliseconds, and release is valid between 5 milliseconds and five full seconds. The white bars next to these sliders allow you to link any or all of them, so for example you can change all attack times at once. These are not proportional, however, so if you link an unlinked slider to the others its value will snap to that of the others immediately.
Believe me, describing this with words is difficult, while actually grabbing a flag and moving it around is simple. Thank goodness for demo versions, don’cha think? You’ll understand what’s going on in less than two minutes once you’ve fired up Neodynium in an editor – it’s just hard to describe here. The IO Map makes Neodynium a bit like a graphic equalizer for compression, and graphic EQs are readable at a glance by anybody with a pulse.
GOZINTA AND GOZOUTA
We haven’t even touched on the input and output sections of Neodynium, which have a lot of cool features. The left-hand input section lets you set an input key, which will make Neodynium follow either the left channel, the right channel, or both. If your editor supports sidechains in plug-ins, then that option will also be available here (Adobe Audition evidently doesn’t). An RMS button makes Neodynium use the RMS value of the input to set its gain, rather than the Peak level. In general, RMS yields a smoother and more natural sounding compression, but may not be effective on transients.
Below this is the Look-Ahead slider, which helps Neodynium catch quick transients by reading ahead of the play buffers, at the price of increased delay at its output. I got the best results by starting with Look-Ahead set at zero, and then advancing it slowly until I noticed the compressor kicking in on attack transients the way I wanted it.
The Key Filter is the control you’ll use if you’re setting up Neodynium as a de-esser. I found it highly useful for other purposes than de-essing, however. Remember, the Key Filter doesn’t actually filter the audio you hear, but it filters the audio that the compressor measures to adjust its gain. You can use up to three filters on the input, and each can be one of seven flavors: parametric, low or high shelving, low or high pass, or notch. When you activate a filter, its curve shows in the window. The number fields below that window let you adjust the frequency, gain, and bandwidth of the filter. In addition to de-essing, I found that the Key Filter could be used to eliminate random rumbles and mouth noises that occur in between sentences. It took a bit of twiddling to make it work, but work it definitely did. There are also buttons to let you audition the actual filter output itself, which was most useful during the twiddley phase.
The Output panel on the right is pretty much as you’d expect it, although the metering has some interesting twists. There’s an Input slider for adjusting the input level to the compressor(s), and an Output level slider with an Auto button that engages whatever amount of make-up gain the plug calculates necessary to offset its gain reduction. Both input and output sliders are capable of providing 36 dB of either cut or boost, more than enough to freak out your audio editor.
EYE CANDY OR NOT?
Neodynium has four different kinds of meters – Key Level meters (little triangles that dance on either side of the IO Map are difficult to see), regular peak input and output level meters (with clip indicators on top), an attenuation meter to show gain reduction as red (or expansion as blue), and what Elemental Audio calls “Cloud Meters.”
The Cloud meters can be found on the outside of the peak meters, and they indicate the amount of energy in your audio at a given volume level. So as your track plays, the Cloud meter on the input side will go from black to white to orange to red, depending on the energy at the volume level where the color shows up on the meter. For example, when I squashed the dickens out of a close-miked male voiceover, the Cloud meter on the output side turned white in the 6-9 dB range and in the 24-48 dB range. As it continued to play, there were orange spots around 24 dB and at 7 dB. This told me that the output of the compressor was either squashed up against the limit, or down in the nearly silent area. In other words, there was not much in the way of dynamics going on, which in this case was appropriate. If the VO was speaking, he was at around 6 dB, and otherwise he was silent.
Cloud meters are reminiscent of the spectral display in Audition, wherein you can see your track in terms of colors that represent different frequencies. Except that the Cloud meters tell you about the volume instead of the frequency content. At first they looked to me like useless eye candy, but as I really began to exercise the compressor I began to see their value. For VO, it turns out that the best-sounding processing was when the Cloud meters showed a good level of white throughout the range of the meters, with occasional orange spots scattered at the top and bottom. So when I saw them show a lot of black in the mid-scale area, it told me that I was over-compressing and it was time to twiddle with the ratios and zone definitions until the meters looked more balanced. Again, it’s something that is difficult to explain verbally, but it’s quite simple to see with your hands on the mouse.
Rounding out the metering section is Neodynium’s built-in Limiter. This beast kicks in when your signal bumps up against 0 dB, and you can choose either a Fast, Medium, or Slow response time for dealing with overs. Since it is a brick-wall limiter, your audio cannot exceed 0 dB unless you’ve turned the limiter off altogether.
Neodynium has two separate “workspaces,” which amount to A/B buttons. You can load two different settings and switch between them for comparison, or copy settings from one into the other. The plug-in comes with some twenty presets that, while music-oriented, provide a good jumping-off point for rolling your own.
DO IT SOUND GOOD?
Neodynium is not a “character” compressor. It doesn’t model tubes, and adds no “warmth” or “phatness” to your sound. It’s very clean and very natural sounding, unless of course you’re squashing the daylights out of your track. In that case it will pump and breathe with the best of them, but it still won’t warm things up. That’s not its job. Its job is to control peaks, and do so differently at various volume levels. It does that job with aplomb. And yeah, it sounds good doing it.
Besides its flexible compression capabilities, Neodynium does something I think is quite important: it shows you the results of your compression settings in a graphical display. Let’s face it, compression is something of a black art to begin with, so anything that helps visualize the result of a particular set of threshold and ratio settings is a Good Thing. Neodynium’s IO Map gives you a pretty clear indication of what will happen to your track at various volume levels, without having to interpret knee effects and such. The Map makes it easy to set up a complex compression scheme, particularly after you’ve clicked the Advanced button, although the little dancing triangles are too small to do you much good.
This is an innovative and interesting plug-in. It does a really good job at taming big-voice VO without cutting the legs out from under it. It doesn’t color the sound, but gives good results and is stingy with computer cycles. What else can I tell ya – download the demo and try it for yourself. It’s a lot of fun for not a great deal of money. And don’t forget to download the free Inspector plug when you visit the website.
Elemental Audio’s Neodynium Compressor is priced at $159.00, although the company is selling it now at an introductory price of $139.00. It is available directly from Elemental Audio’s website, at www.elemental audio.com.
♦
