Although you can’t use the ADAT interface and the S/PDIF or AES/EBU connectors at the same time, using the ADAT interface and the analog inputs together lets you record up to 10 tracks at once.

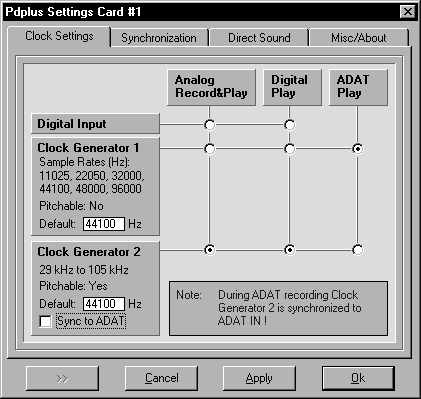
Clicking the SETTINGS checkbox (figure 3) lets you choose digital clocking options. The PRODIF PLUS card has two internal clocks, or you can clock it from your digital audio source. This stuff is important if you’re working with digital sources and master recorders, and it’s nice that SEK’D provides a straightforward interface for choosing amongst a lot of options.
INSTALLING SAMPLITUDE
Samplitude Studio is a multitrack recorder, editor and mixer. It will handle up to 999 tracks, performs true non-destructive editing, and includes a mixer with real-time effects, EQ and dynamics.
Samplitude Studio requires a PC with at minimum a Pentium 166 processor, plus a CD-ROM and floppy drive. It runs under Windows 95/98 or Windows NT, and wants to see a minimum of 16 MB RAM (32 for Windows NT). However, the number of effects and tracks you get is directly proportional to the power of your computer, so you want a fast machine and lots of memory. I evaluated Samplitude using the PRODIF PLUS card, installed in a Dell OptiPlex with a 500MHz Pentium III, 256MB of RAM, and a 20 GB EIDE hard disk. This computer proved more than adequate for Samplitude.
The package includes a CD, a floppy disk for authorizing the program, and a 290-page manual, which is conveniently wire-bound so it always lays flat. This is a small thing, but it becomes very important as you start working with the software. You’re gonna need the manual close at hand. Samplitude is a powerful program, but it is not especially easy to learn.
Installation was simple, once I figured out which file was the installer. The CD includes a large number of audio examples and a two-part video tutorial, and I highly recommend installing all of those with the program. They’re essential to help you get the most from the software.
THE BIG PICTURE
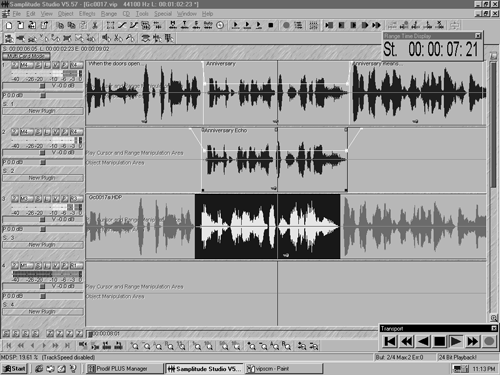
When you first start Samplitude, you’ll find yourself looking at the VIP (Virtual Project) screen (figure 4). This is where all the recording and editing action takes place. Although it can be a bit intimidating at first glance, once you’ve looked at the video and skimmed the start of the manual you’ll have a good grasp on things.

Of interest are the seven buttons next to each track. They are, from left to right, a Track Properties button that yields general information, a Mute button that when right-clicked lets you assign the track to a particular output, a Solo button, a Lock button that locks the track in place, a Volume curve button that when activated lets you draw custom volume graphs, a Pan curve button that works like the volume curve, and a Record enable button. Right-clicking the Record enable button lets you choose which audio input will be recorded on that track.
Below these are level meters and sliders that control the overall volume and panning of the track. Beneath the sliders is a “slot” that allows you to assign a DirectX plug-in to that track.
Along the top of the screen you’ll find the iconic toolbar. You can add, remove, and rearrange the icons on the toolbar to have it display the exact functions you want. A helpful feature is the label that appears if you leave the cursor over a particular icon.
The “S” and “Z” buttons along the bottom of the screen let you store and recall various position and zoom levels for easy recall. The other icons on the bottom of the screen move the screen left and right by various distances. While I understand their function, I found them less-than-useful in navigating forward and backward through a track. I prefer to use the scroll bar, or better yet the arrow keys on the keyboard.
VIRTUAL PROJECTS
A Virtual Project is composed of one or more “physical” projects, or sections thereof. The advantage to this system is that you can do any kind of editing you want to a Virtual Project, and it doesn’t change the original sound files. This is true non-destructive editing. For example, if you wanted to have several different mixes of the same set of tracks, you could just create different Virtual Projects. Each Virtual Project could mix and match sections of different tracks, without altering the original track files, or using more hard disk space.
The Virtual Project is the powerhouse of Samplitude. A Virtual Project can have up to 999 tracks, subject to the power of your PC. I was able to create Virtual Projects with 128 blank tracks without incident, although I doubt I could play that many tracks of audio with my PC. I was however able to play a project with 24 tracks of simultaneous audio, which is overkill for radio anyway.
Clips of audio can be arranged on the tracks however you like. These audio clips are considered either “hard-drive” Projects (HDPs) or “RAM” Projects (RAPs), depending on where they are stored, and they are your basic building blocks. They can be recorded right into the virtual project, imported from existing .WAV files, or imported directly from CD. Once a clip is part of a Virtual Project, it’s referred to as an “Object,” and it can be manipulated much like an object in a desktop publishing program. Naturally, you can drag it forward or backwards in time, or from one track to another.
If you click on an Object, it will show 5 little handles. Moving the bottom handle at either the beginning or the end will change the length of the Object. Moving the top handle raises or lowers the volume. The 2 handles in the upper corners are for fades. Pulling one of these handles towards the center creates a fade-in or fade-out from the desired location. All of these changes are part of the virtual project, but the original sound file is not changed.
Although this can be a very efficient way to work, you have to learn how Samplitude works before you can get much done, so it isn’t the kind of program that you install the night before the big deadline. In other words, expect to read the manual. Another thing that makes the Samplitude learning curve a bit long is that they do not adhere to all the standard Windows conventions. Control S saves, but Control O doesn’t open. If you want to cut audio within an Object, you have to use the OBJECT menu instead of the EDIT menu. Some keys do what you expect, some don’t.
A word about keyboard equivalents: if you want to take advantage of Samplitude’s speed, plan on learning ALL the keyboard shortcuts. Shortcuts are a very necessary evil in Samplitude, and they are infinitely faster than using the menu bar with its many submenus. There are over seventy keyboard shortcuts, and once I’d memorized a couple of dozen, the editing process just flew by.
Lastly, you can now import and export MPEG audio directly within Samplitude, if you buy QDesign’s i-Media MPEG Pro software upgrade. The bad news is that the upgrade is $395, which is nearly the price of Samplitude itself.

