THE REAR PANEL
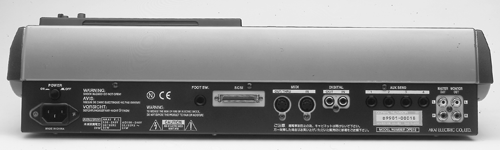
Leftmost on the back panel is the power switch and AC receptacle. To the right of that is a footswitch input that accepts a momentary contact closure. This can be programmed for punch-in and -out or for play and stop. The external SCSI connector is next, and you may need to buy an adaptor for it as it’s the high-density 50-pin variety. You don’t see this connector often, but I had no problem finding an adapter at CompUSA.
Next come the MIDI jacks, one for MIDI IN and the other for either MIDI OUT or MIDI THRU. Further to the right are the digital I/O connectors, which are IEC-958 Type II (S/PDIF) on RCA connectors. There are four aux sends on 1/4" unbalanced phone jacks.
The Master Out and Monitor Out are also on unbalanced RCA jacks. They’re both fed by the main stereo bus, but the Monitor Out has a separate volume knob on the front panel.

I’M IN THE MODE FOR SCREENS
When first powered on, the DPS16 goes through its diagnostic routines and lands on the MAIN SCREEN with the last project used (if any) loaded and ready to go (see figure 1). The MAIN SCREEN is the home page of the DPS16, and as such its Mode button has blue screened around it.
Thanks to the large display, the DPS16 lets you see both input and track meters in nearly all Modes. They appear in the top half of the display along with the counter, which displays time in an hours:minutes:seconds:frames format. Also on the top is a counter that works in bars and beats, the project name, the remaining recording time of the disk, and a little bar graph that shows the amount of disk activity.
Below the meters is a graphic representation of 16 audio tracks, with a NOW line in the center. Hitting PLAY will cause the tracks to move from right to left past the stationary NOW line, much like tape moves past the play head.
On the right side of the display is a graphic representation of the controls that are connected to the six Q-Link knobs. In this example the Q-Link knobs are set to control the aux send levels. Along the bottom are the softkey labels. Pressing the rightmost softkeys (F5 and F6) lets you change the function of the Q-Link knobs to control channel EQ or effects parameters as well.
Like most digital mixers, you first select a channel and then tweak using the Q-Link knobs. For example, to adjust the aux send levels on mixer channel 5, you would press channel 5’s TRACK SELECT button, then use the Q-Link knobs to make the adjustment. The field above the onscreen knobs would change to read CHANNEL 5 instead of MASTER as in figure 1, so it’s easy to keep track of which channel you’re working on.

Pressing the Mode button labeled MIXER lets you see a representation of the digital mixer, with the meters remaining in the upper half of the screen (see figure 2). In this figure, the 16 faders that control hard disk tracks are on the bottom, and above them are the faders that control the ten inputs, with the ones labeled L and R being the digital inputs. By turning the jog wheel you can scroll through all the settings for fader levels (shown), panpots, EQ, aux levels and pans, and channel mutes.
Of interest is the 3-band 56-bit digital EQ, which is configured as sweepable, low-shelving, and high-shelving, and a fully parametric mid-band. Like most digital mixers, the frequency controls are stepped, but all three bands have 128 steps per octave. This is as fine a resolution as you’ll find on many expensive digital consoles, and is more than enough control to isolate a problem frequency.
Pressing the CHANNEL softkey (F2) lets you see all the EQ settings for a single channel at one time on the screen. Again, to see a different channel’s settings, you just press a different TRACK SELECT button. Pressing the SCENE softkey (F4) lets you store and recall all the mixer parameters in one of 26 scene memories. Handy stuff.

PATCH ‘EM, TONTO
My favorite feature of the DPS16 is the virtual patch bay you access with the PATCH button (see figure 3). This graphical representation of a patch bay lets you see exactly where each input and output is going. If you have your VO mic plugged into input 1 to use the mic preamp, but you want to record on track 5, you simply press and hold the TRACK SELECT 1 button, and then press the RECORD SELECT 5 button. The screen will immediately reflect your action by drawing a line between the Source 1 and the Record Track 5 circles.
Wanna use the digital inputs to bring in a music bed from CD and record on tracks 1 and 2? Simple — press TRACK SELECT L and then RECORD SELECT 1, let go, then press TRACK SELECT R and then RECORD SELECT 2. You’re done, and you can easily see it on the screen. It’s very slick.
Pressing a input’s INPUT SELECT and then a TRACK SELECT will send that input directly to the mixer’s stereo bus. The heavy black line between Input and Source will disappear, and will be redrawn going from Input to the “Sent to Mixer” box in the upper left. This is useful for monitoring tracks that you don’t want to record at all, or for bringing in additional audio sources at mixdown time.
To reset the patchbay to its default configuration (shown), you just press DEFAULT (F6). To clear all connections and start from scratch, just press CLEAR (F4). The DPS16’s virtual patchbay is by far the most clear and concise representation I’ve seen on any digital mixer, and makes repatching an absolute breeze.

Assigning effects in the DPS16 is equally simple. Pressing the Mode button labeled EFFECTS brings up a screen that shows the four channel processor on the left, and the available effect presets on the right (see figure 4). You turn the jog wheel to choose an effect from the list, and press SELECT (F1) to assign it to the current processor channel. You can configure the processor as four mono effects, as two monos and one stereo, or as two stereo effects. The four channels are connected to the four auxes by default, and return via Inputs, so you can easily record tracks wet, or record the effects on their own tracks and mix them later.
There are 44 separate effects available, including 8 different reverbs, a pitch corrector, an exciter, and a whole slew of phasers, flangers, filters, choruses, and echoes. The effects also use 56-bit digital words, and their sound quality is excellent.
